
Tech Notes.
MTLS x Nginx
MTLS - Mutual Transport Layer Security
To understand better let's first go through TLS i.e. Transport Layer Security.
The rise of internet and problem that followed
When the internet initially started, the ability to transfer data was was a huge break through. Soon after, people realized that it is not so great from privacy and security perceptive. The data shared on the internet is in plain text format. So anyone in the network can see and temper that data. Even today when we try to login on a website that is served on http, our browser warns us. Reason being the same, data will travel in the network as plain text. That means, anyone i.e. other users in network, hackers (Man In Middle) or Internet service providers can intercept the request. They can then read or update the request.
To understand better, let's consider the example of sending a transaction.
I am making a payment to my friend.The hacker intercepted the payment request and updated the account number. Server completed the request and sent me the response. The hacker intercepted the response and updated the recipient account number to my friend's. I got to know about this payment issue, weeks later only after my friend complaint.
The Problem
- Requests can be tempered
- Response can't be trusted to be from the server
Internet, not so secure after all, huh.
HTTPS
Now that the problem was discovered, developers get to work. The idea was simple, not the implementation though, encrypt the data while it travels in the network.
This is where TLS comes in picture. Its the core tech behind the https we see today.
It tries to solve the problems we discussed. It encrypts the data from both ends, so all the networks agents will see is encrypted string. The can't decrypt it and if they mess with this encrypted string, it fail to decrypt on the destination.
In order to understand how https work, we need to know how internet works.
How internet works ?
When we type google.com, how exactly does the browser knows what to show us ? Let's understand.
When we type a url in the browser, browser connects to a DNS server asking it to resolve the address for the domain. The DNS server provides the IP address of the host for that domain. Then our browser connects to the server's endpoint and shows us what the server responds with.
These DNS servers are usually from Google (8.8.8.8) or Cloudflare (1.1.1.1)
Key take away
- We don't connect to domain names are just tags so we can easily remember them.
- Domains are key to server addresses
- We interact to servers attached to those domain
How the hackers attack ?
(One of the many ways)
Like we see in the movies, they mention in order to hack their secure network we'll have to enter the building and connect their network first. Well, that's actually true.
- They'll first have to connect to the network.
- Then they'll have to break into router.
- Then they can update the DNS server address
- Now all the DNS search queries will be resolved by their server
- They manipulate the address for domain they want to attack
- Now when user wants to access the site, it ends up interacting with hacker's website
How HTTPS helps ?
- It helps encrypt the communication between client and server, hence secures from interception
- It makes sure that the server is exactly who it is claiming to be
- For ex. if we hit https://abc.com, https makes sure that the server we connect to is actually the one from abc.com
But how? It’s not magic, this is the sheer brilliance of engineering.
Let's now understand the tech behind one of the most basic entity that helps us stay safe on the internet.
Technical Details
Process Overview
In this entire flow, we have some parties included. We will go through them as we discuss.
Browser or client initiates the request. This starts the SSL handshake. Once the handshake is complete, key is generated for encryption. Thereafter the same key is used encrypt the data to be transferred.
SSL handshake
Basic Terminologies
- Certificates - Certificates are proof of authenticity for a domain. These certificates can only be generated upon providing the ownership of the domain.
- Certificate Authority - The agencies that provide these certificates upon verification of domain ownership
- Keys - These are cryptography key, used for encryption/decryption
- Private key
- Secret asymmetric cryptography key
- Used to decrypt data
- Digitally signed for authenticity
- Should always be kept very secure nad not shared
- Public key
- Generated with private key's signature
- Used to encrypt data, that can only be decrypted with the pair private key
- Verifies the digital signature of the private key
- Can be shared
Understand server certificates
There exists some widely recognized agencies that issue certificate of authenticity for websites. They are called Certificate Authority (CA) I own devdanish.in.In order to get the certificate I'll have to go to any of these agencies and prove ownership of the domain. Some common examples are DigiCert and Let's Encrypt.
To do that, I'll have to make the specified entry of TXT type in my DNS. Since I own the domain I can do that, someone who is not the owner will never be able to update the DNS. Now they'll very if the domain has that DNS configured and provide me the certificate.
I'll then keep the certificate on my server and with a little config I'll be fine.
Since these agencies are widely recognized and trusted, most of clients come prebundled with them and validate certificates with them. Our browsers also have them, for chrome, you can check the certificates at chrome://certificate-manager/ . Java uses CAs from here $JAVA_HOME/lib/security/cacerts
(Skipped the certbot part, we'll discuss later)
Steps overview
- Client initiates request
- Server shares its certificate
- Client validates the certificate with trusted CAs
- If CA rejects the certificate, we get SSL Handshake failed errors
- Upon successful verification, a encryption key is generated
- Data is then encrypted with this key and communication remains secure
But wait, aren't we devs? This is not enough, let's dive deeper.
Internal steps
Refer this diagram
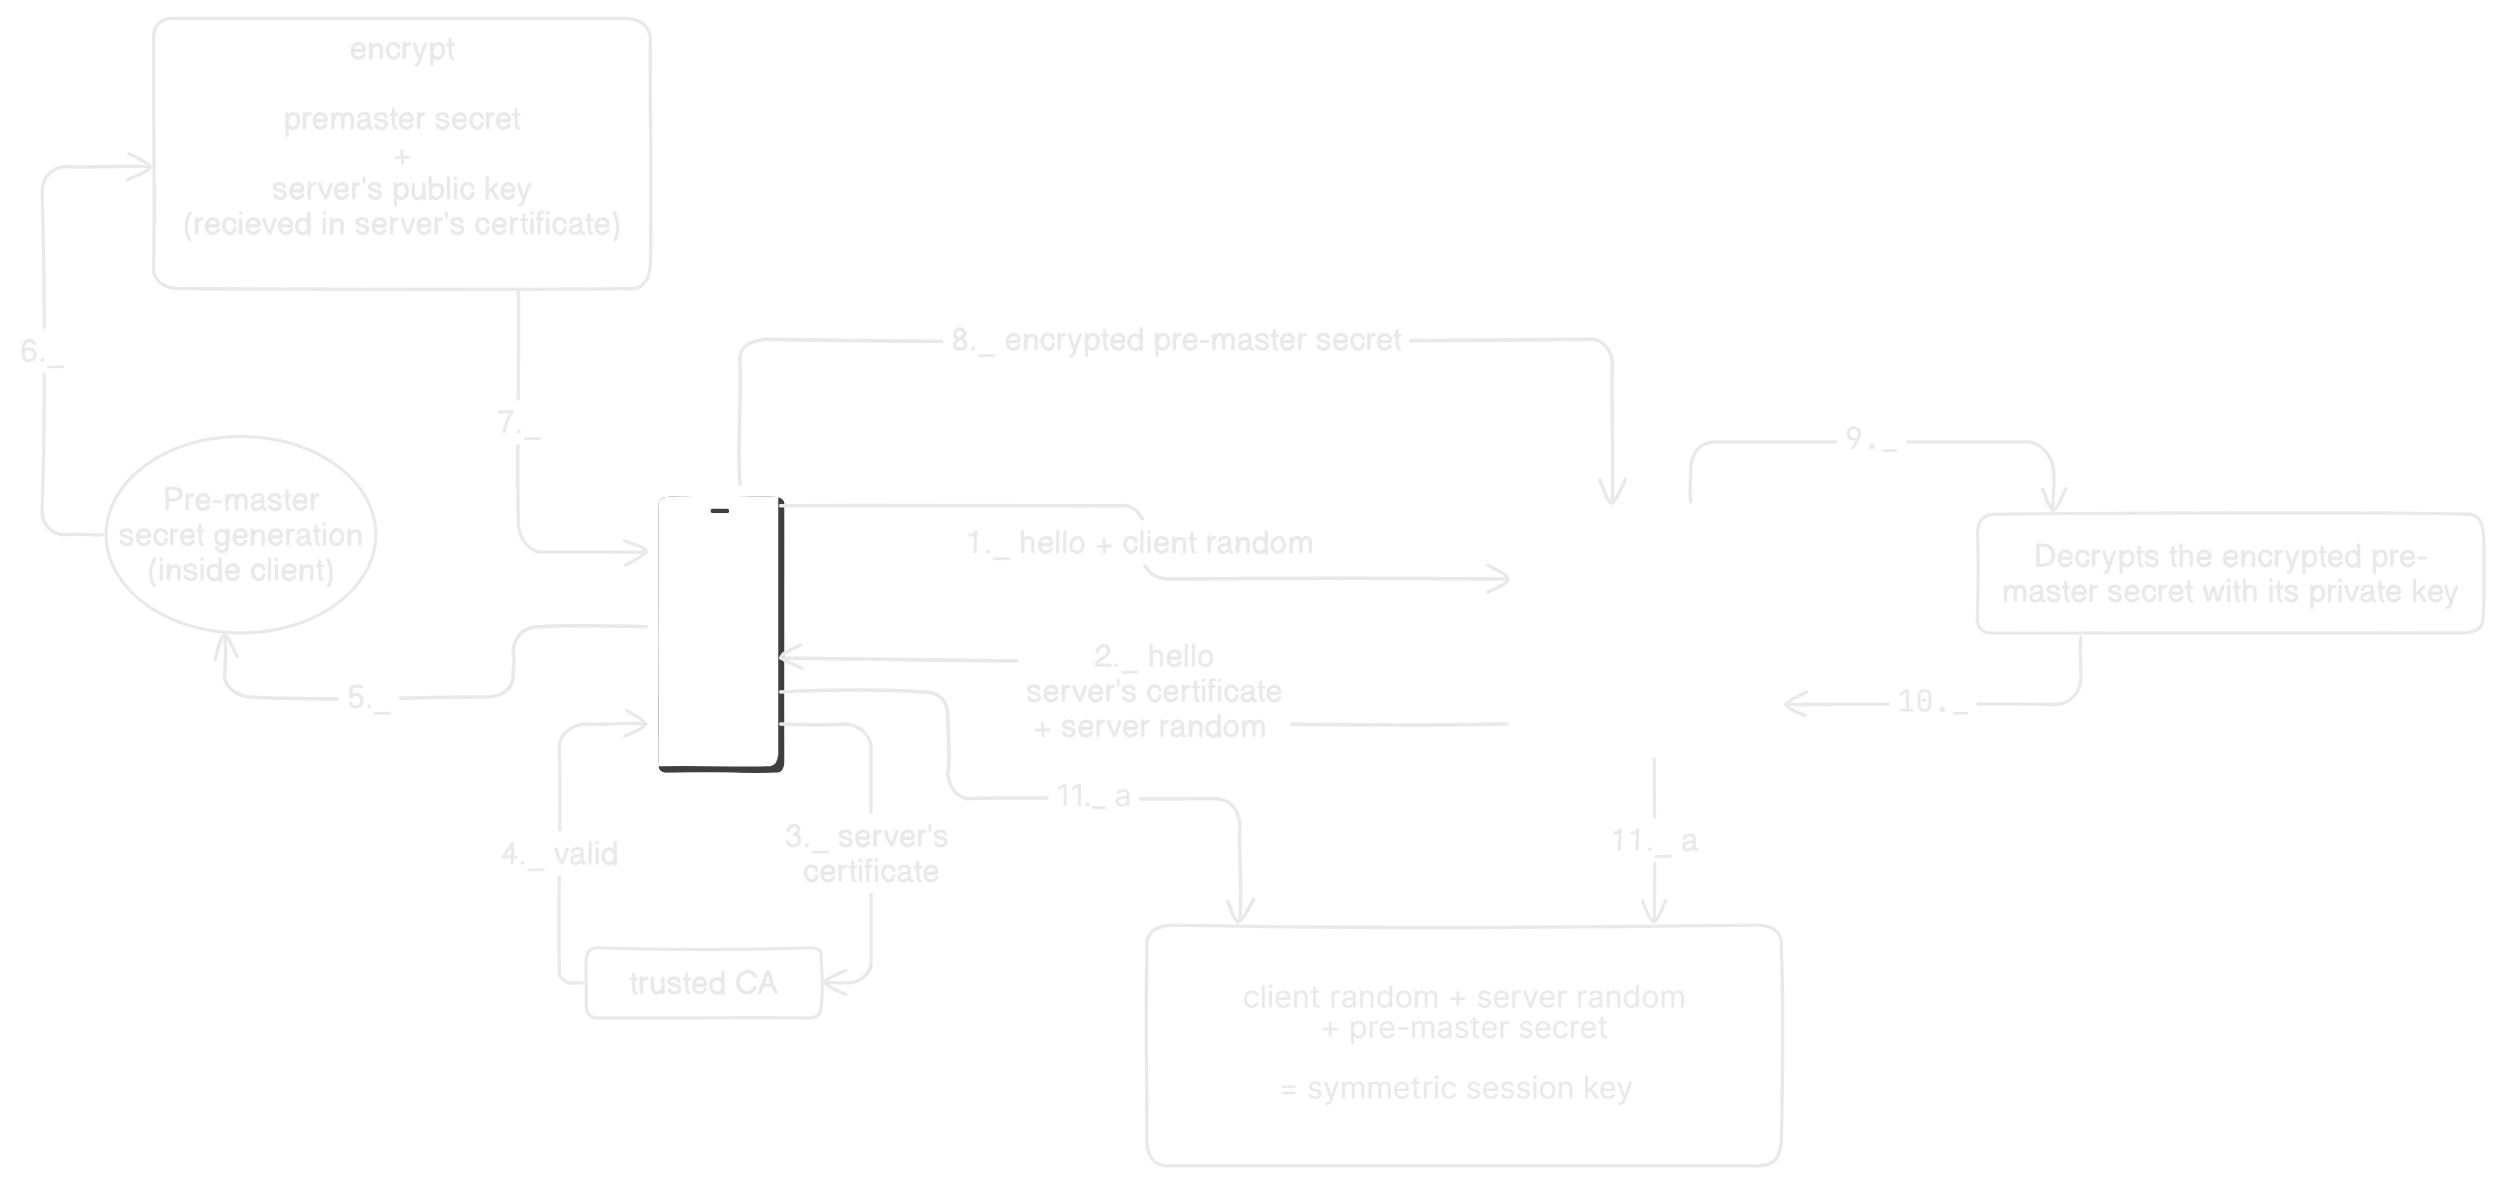
Steps involved
Step 1
- Client initiates connection request
- Sends ClientHello and a random generated value
- ClientHello contains details which is used to negotiate Cipher Suit, Key Exchange method and protocol version
Step 2
- Server responds with ServerHello - the strongest mutually supported options
- Along with Hello, server shares its certificate and a random generated value
Step 3
- Client validates server certificates with its trusted CA
Step 4
- CA provides validation status
Step 5
- If CA had reject the certificate, Handshake fails
- Else, Client generates a cryptographic value called **pre-master secret**
Step 6
- Client extracts server's public key from its certificate, received in step 2.
- Then it wraps, the pre-master secret with server's public key
Step 7
- (maybe i added it just for visuals 😅)
Step 8
- Encrypted pre-master secret is passed to server
Step 9
- Server decrypts the encrypted pre-master secret with its private key
Step 10
- (again for visual aesthetics 😅)
Step 11
- Server and client both have now these three fields
- Client random (client shared with server in step 1)
- Server random (server shared with client in step 2)
- Pre-master secret (Generate on client and shared with server)
- These three fields are now used to generate a symmetric session key
- This key is then expanded in multiple other keys as below
- Client write key
- Server write key
- MAC keys (TLS 1.2)
- IVs, etc
- These keys are then used to encrypt the data in request and response
We aren't just devs. We are the pros. Let's do everything in house and get better understanding.
Implement our own https calls
Let's create our node server and java client and make them communicate over https protocol.
From our understanding till now, we know we'll need CA signed keys. But we don't have a domain, how are we gonna make this happen ?? Remember, we are the pros
Here is the plan to simulate everything on local.
- We create our own CA
- Add its certificate to browser and truststore of our java client
- We'll sign server certificates for pro.dev and use that in our server
- we'll add pro.dev to point on our localhost in host file
- Run nginx on local (we'll discuss nginx later, just follow along)
- Redirect https calls on 443 to our server running locally
- Thus, we'll be able to run pro.dev locally over https calls
Let's do this 🤩
Make this simple entry in your hosts file 127.0.0.1 pro.dev
You can find hosts file at
C:\Windows\System32\drivers\etc
First things first, let's generate the certificates. If you're feeling lazy, which you shouldn't, clone the repo and run this bat file. It'll generate the certificates for you.
But let's do each step manually here and understand.
Generate Certificates
Certificate Authority
- Navigate to certificates directory in terminal
- create two folders, for server and certificate authority
mkdir certificate_authority server_data
- Generate CA key
openssl genpkey -algorithm RSA -out certificate_authority/ca_private_key.pem
- Generate CA self signed certificate.
openssl req -new -x509 -key certificate_authority/ca_private_key.pem -out certificate_authority/ca_certificate.pem -days 365- It'll ask few details fill them in
- These are the details that browser will use to know about our CA
Server
- Generate server private key
openssl genpkey -algorithm RSA -out server_data/pro_dev_server_key.pem
- Generate a CSR
openssl req -new -key server_data/pro_dev_server_key.pem -out server_data/pro_dev_csr.csr- These are the details about our server
- Generate config file (on cmd)
echo subjectAltName=DNS:pro.dev,IP:127.0.0.1 > server_data/san.ext
- Generate CA signed key
openssl x509 -req -in server_data/pro_dev_csr.csr -CA certificate_authority/ca_certificate.pem -CAkey certificate_authority/ca_private_key.pem -CAcreateserial -out server_data/pro_dev_server_cert.pem -days 365 -extfile server_data/san.ext
- That's just it. We have generated all the certificates we need.
Server Setup
We are using a express server here. You can have any framework of your choice. All support this, just with different syntax.
We'll create the express app as usual. We'll use one package called https. Then in our index.js we'll prepare an option object like this
// Load server's private key and certificate
const options = {
  // private key
  key: fs.readFileSync('./../certificates/server_data/pro_dev_server_key.pem'),
  // server certificate
  cert: fs.readFileSync(
    // CA signed certificate
    './../certificates/server_data/pro_dev_certificate.pem'
  ),
  // passphrase for the private key
  passphrase: 'Danish',
};
// other code
// my port is 3300
https.createServer(options, app).listen(httpsPort, () => {
  console.log(`https server running at: https://localhost:${httpsPort}`);
});
That's it. Our server is now able to accept https request.
Browser setup
Open firefox and go to https://pro.dev:3300/greet/danish.
That's a scarey warning 😱. Why ??
Our server certificates are signed by our CA. Browser doesn't trust the one who signed the certificate and hence rejected the request.
This will not happen if we are using actual keys for domain signed by a well recognized CA.
Let's fix that.
- Go to
about:preferences#privacy/ - search for certificates
- Click view certificates
- Go to Authorities tab
- Click import
- Select CA certificate (ca_certificate.pem)
- Select checkbox "Trust this CA to identify websites"
- Hit okay and done
- Now refresh the page and it works
Java Client
How do other api clients access our endpoints with secure connection?
They come with bundled CA certificates they trust. For Java they reside in $JAVA_HOME/lib/security/cacerts. If we use a well recognized CA our this will be handled by default.
Here we are using our own CA. Hence, we need to add our CA to java's truststore so it can trust our CA.
 // Load CA certificate
  CertificateFactory cf = CertificateFactory.getInstance("X.509");
  KeyStore trustStore = KeyStore.getInstance(KeyStore.getDefaultType());
  trustStore.load(null, null);
  trustStore.setCertificateEntry("ca-cert", cf.generateCertificate(Files.newInputStream(Paths.get("./../../certificates/certificate_authority/ca_certificate.pem"))));

  // Set up trust manager with the CA certificate, since the node certificate is not signed by a authorized CA
  TrustManagerFactory tmf = TrustManagerFactory.getInstance(TrustManagerFactory.getDefaultAlgorithm());
  tmf.init(trustStore);

  // Initialize SSL context with key and trust managers
  SSLContext sslContext = SSLContext.getInstance("TLS");
  sslContext.init(null, tmf.getTrustManagers(), null);

  // Create HTTP client with SSL context
  HttpClient client = HttpClient.newBuilder().sslContext(sslContext).build();
This loads the CA certificates and trusts the certificates signed with it. Now, we can https calls with this client and it'll allow handshakes for our certificates
That's it. We have now achieved TLS on local. But I still don't like that we using ports in url. How often do we see a site mentioning port number??
To solve this, comes in Nginx.
Nginx
It's a web server. It is mostly used as a reverse proxy and load balancer. It is capable of handling huge number of concurrent requests with low memory.
Below are the common use cases of nginx:
- Reverse proxy
- Load balancing
- SSL (relevant for this article)
- Serving static content
- Caching
- Rate limiting
Although to us SSL is relevant here, but its very important to understand proxy server if we are discussing Nginx.
Proxy
Our best friend bunks collage and goes on a date. We are there to shout "present mam" during attendance for their roll number. That's proxy.
When our mom is sick and can't even visit doctor in other city frequently and we get her test done at home and take results to doctor. Doctor prescribes accordingly. That's another proxy.
Proxy is basically an agent working on behalf of someone or something else. It mediates the conversation and filters or modifies accordingly.
In a client server architecture, the request goes from client to the server and response comes back from the server to the client.
Proxy server's sit in between the client and server. They intercept requests, filter and modify them as configured.
Depending on the direction of data flow they intercept, they are categorized as forward or reverse proxy.
Forward Proxy
A great example would be VPNs. When we want to certain movies, that are not available on netflix india, we turn the vpn and watch it.
How does that actually works ?
Netflix servers has region checks. When we hit the url for movie it checks our IP address to determine our geolocation. Since content is banned in India, it denies the request. When using a VPN, your request is routed through a VPN server (e.g., in the US). The VPN server acts as a proxy, forwarding your request to Netflix. To Netflix, the request appears to originate from the VPN server’s IP, which is in the US. This time, to netflix, the request would be coming from US. It'll server the content to vpn server and the server will return the content to us.
Since, the data was going to the server, i.e. flow was in forward direction, it is forward proxy. When flow is intercepted, before reaching the server, it is forward proxy.
If the server doesn't know which client it is responding to it is forward proxy. In forward proxy, the request is intercepted before it reaches the actual server that needs to responds to it.
These forward proxies are also used to block access to social media or malicious websites in schools and offices.
Another example would be organization resources are hosted on another server and block from external communication. Then a proxy server setup for authentication and authorization. Thus the main server can remain focused on resources while the proxy server handles the security part.
Reverse proxy
In this case, the client is not aware which server is giving response to it. The server that client interacts to, doesn't provide the response itself, rather it acts as a medium of communication to actual server.
How it works
This is a bit tricky to understand. Let's try
Imagine we have 20 servers setup for our resources. The access to these servers are limited to only the designated employees.
- Since we have limit the access each will need security implemented
- We also need to have rate limiting on each
- Since these servers endpoints would be publicly accessible, even if it returns people 401 or 403
- Each server would need to handle its SSL certificates
- If the code is written in multiple languages, which is pretty common, managing them becomes quiet a task
A reverse proxy solves these problems. With a reverse proxy these can be managed easily.
- Instead of managing security at these 20 servers, we'll not expose them to external network. These would only remain accessible in the internal network.
- We'll implement the security checks, rate limiting, certificates e.t.c only one server
- Now this server will act as proxy for other resources
- Clients will hit this server and it'll perform the checks. Then it'll pass the request to internal servers
Quick Comparison
In case of forward proxy, client sits behind the proxy server and requests are made directly to the server which will serve the request itself. In case of reverse proxy, clients don't interact with the actual server that is responsible to serve the request. Rather, they connect to another server which will then get data from other server.
Example
Imagine we need to get some data from an external API. But the API has not enabled CORS. Now front end is not able to communicate. We then setup a proxy server in our system. We enabled CORS for our app. Then we forward the requests to the original server. This will help us bypass the CORS issue. In this case, our data is being request on behalf of the client through a proxy server. Hence, its a forward proxy.
Now, imagine we have a microservices application. Each request comes to api gateway and that server then forwards the request to destination server.
In this case, data from responsible server, is being served through a proxy server. Hence, its a reverse proxy.
Nginx for SSL
In microservices, we can have 100s of services running, each being severed on our domain. So, each will have to manage the domain certificates to serve on https. Managing a setup like that can be a nightmare.
But hey, we are the pros, future architects. We think scalability, optimization and maintainability. We have already seen how nginx can be used as reverse proxy server, how about we keep that public and let that handle certificates. Then it will forward the requests to our internal services. Thus our system will be serving requests over https without each server handling the certificates.
Notice how our services were available on https://pro.devs:3300. But how often do we see a url with port number on the internet ? That's because almost all uses some sort of reverse proxy application, mostly nginx.
Setup
Now let's setup nginx to run our app in production simulation.
Download nginx from here : https://nginx.org/en/download.html and extract in desired location. Here are the basic commands we need
start nginx: This will start our server. You can visit the page on http://localhost or http://localhost:80nginx -s reload: This will reload the configsnginx -s quit: This will stop the server
Before we start please note that the default port for http request is 80 and for https its 443. Since we are simulating a https setup, we'll target port 443.
Nginx behavior can be controlled by a file nginx.conf. When we install nginx, inside the installation directory, there is another directory conf, there we can find this file.
Nginx doesn't uses certificates with passphrases. We'll have to generate another certificate with CA certificate but without passphrase Go back to our project directory and get inside the certificates folder.
- Location to generate certificates for Nginx :
mkdir nginx-cert- Generate the private key for our certificate
openssl genpkey -algorithm RSA -out nginx-cert/pro_dev_server_key.pem- Enter the details prompted and leave this blank A challenge password [ ]
openssl req -new -key nginx-cert/pro_dev_server_key.pem -out nginx-cert/pro_dev_csr.csr- Config file to be used in next step :
echo subjectAltName=DNS:pro.dev,IP:127.0.0.1 > nginx-cert/san.ext- This will generate our CA signed certificate :
openssl x509 -req -in nginx-cert/pro_dev_csr.csr -CA certificate_authority/ca_certificate.pem -CAkey certificate_authority/ca_private_key.pem -CAcreateserial -out nginx-cert/pro_dev_server_cert.pem -days 365 -extfile nginx-cert/san.ext
Let's setup nginx now
Inside nginx installation directory, exists conf folder, create new location under there ssl/pro.dev and paste the private key and certificate generate in the last steps. To me the location looks like this C:\Program Files\nginx-1.24.0\conf\ssl\pro.dev.
Inside our nginx.conf, leave the existing content as it is and add the code as below :
...
http {
  ..
    server {
      server{
        listen 443 ssl;
        server_name pro.dev;
        ssl_certificate ssl/pro.dev/pro_dev_server_cert.pem;
        ssl_certificate_key ssl/pro.dev/pro_dev_server_key.pem;
        ssl_protocols TLSv1.2 TLSv1.3;

        location / {
            proxy_pass http://localhost:3200;
        }
    }
    }
  ..
}
...
Remember, our server was running on port 3300 with TLS and without TLS on 3200
After doing this, let's refresh the nginx config with nginx -s reload. And that's it. We have already setup our browser to trust the CA. Go to https://pro.dev/greet/danish. Now tell me if that's not cool 🤩🎉. We have successfully deployed a website on local.
Nginx TLS in production
Our TLS setup is now done. It's good for understanding but thats not how things actually work on production. We are the pros, future architects we need to understand the system in wholistic fashion. But to follow along in this section, we'll need a domain and an EC2 instance. I highly recommend spending some money here. There is no better investment than investing our skills.
However, you can skip this section if you want to.
Setup
I have a domain for <devdanish.in>. You can have your own. Create a EC2 instance, I'm using Ubuntu instance. Make sure to have SSH access to it by generating the keys. Also, we'll be using docker here because that is very common in industry, although new norm is to pair it up with k8. If you don't understand docker I recommend you learn that as well from technotes.devdanish.in/docker
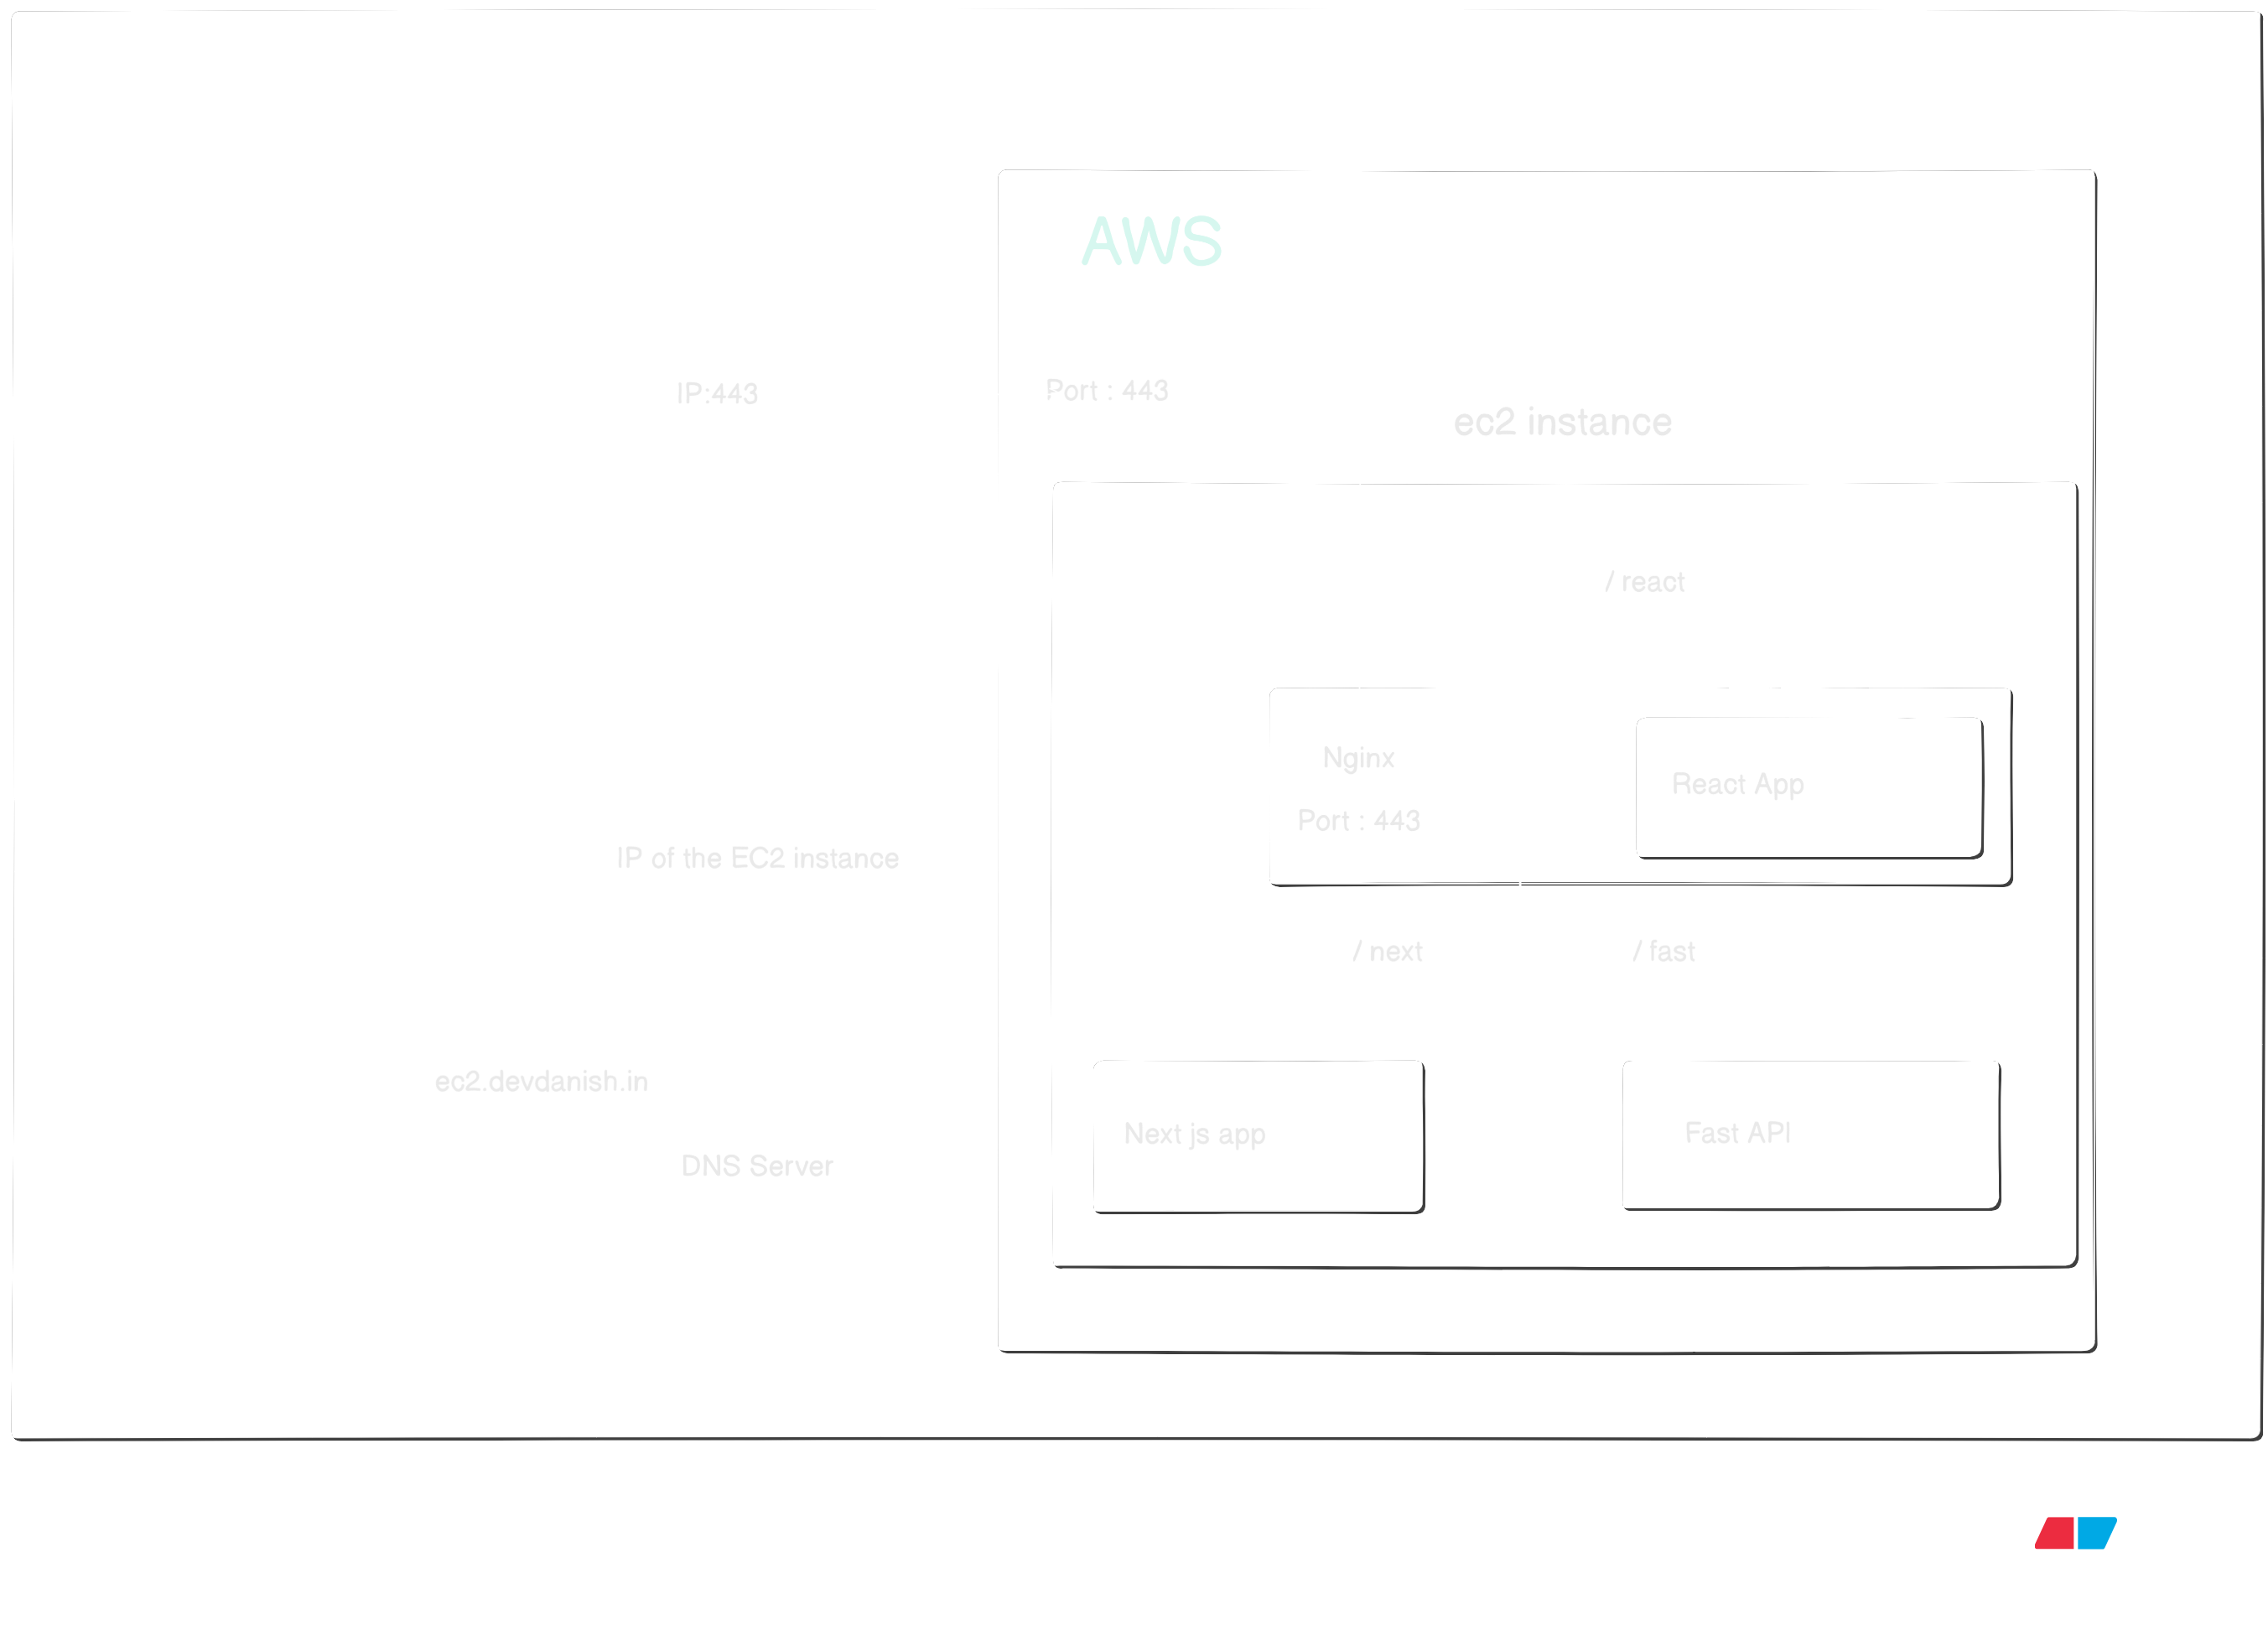
The project is simple. We'll server multiple services on our domain over https with nginx.
- A React app being served on path
/react - A NextJs app on
/nextpath - A FastApi endpoint being served on
/fast
Remember who we are ? Yes.
- We'll containerize our apps in docker
- We'll not expose their endpoints
- The only exposed endpoint would be our nginx
- We'll put all the containers in same docker network
- Nginx will act as a reverse proxy and forward the requests our apps
- Nginx will be handling certificates for https connections
Here is what the design looks like :
EC2 Security Policy Setup
- Make sure to enable outbound traffic for http connections
- Allow inbound traffic for port 443 from any ip address
DNS setting
- Sign-in in the DNS management console for you domain provider
- Add a new entry of type A, name ec2 and value as public IP of the EC2 instance ip.
(I'm hosting on <ec2.devdanish.in>, hence this values. You can update as per your choice)
Certificates setup
Unlike the self signed certificates we have used so far, we'll be using an authorized CA certificate this time. We'll skip the manual commands and setup everything with certbot.
- Install certbot :
sudo install certbot - Get certificates :
sudo certbot certonly --standalone -d ec2.devdanish.in
This will verify our domain and get us certificates signed by DigiCert.
Docker Setup
We already have ssh access to our EC2. Follow this to setup docker in your instance.
Nginx Setup
Let's setup our nginx now. Start by creating a nginx folder in your user's home directory.
mkdir nginx- Then create two more directories
mkdir html react - We'll keep our index file and react build in these.
- In a new Git bash terminal use scp command to send your index.html to the server
scp -i <path to key> <source file path> <username>@<instance ip>:~/nginx/html- Similarly send react build directory as well. How ? Learn it
- Next, you can have your own docker-file or use the one I am using.
  services:
    fast:
      image: devdanishjaved/ec2-fast:v4
      container_name: fast
      restart: always
      networks:
        - ec2
    next:
      image: devdanishjaved/ec2-next:v6
      container_name: next
      restart: always
      networks:
        - ec2
    nginx:
      image: nginx
      container_name: nginx
      restart: always
      ports:
        - "80:80"
        - "443:443"
      networks:
        - ec2
      volumes:
        - ~/nginx/default.conf:/etc/nginx/conf.d/default.conf:ro
        - ~/nginx/html:/usr/share/nginx/html:ro
        - /etc/letsencrypt:/etc/letsencrypt:ro
        - ~/nginx/react-build:/usr/share/nginx/react-build:ro
        - ~/nginx/client-cert:/etc/nginx/certs
      depends_on:
        - fast
  networks:
    ec2:
      driver: bridge
      name: ec2
- Here is the nginx config file I'm using, you can please update as per your setup
  # Forwards all the incoming requests on http to https with redirect status
  server {
      # Port number
      listen 80;
      # the domain we want to serve
      server_name ec2.devdanish.in;
      return 301 https://$host$request_uri;
  }

  server {
      # port number with ssl/tls enabled
      listen 443 ssl;
      # my domain
      server_name ec2.devdanish.in;
      # path where to the certificates (we have mounted this path to host machine directory)
      ssl_certificate /etc/letsencrypt/live/ec2.devdanish.in/fullchain.pem;
      ssl_certificate_key /etc/letsencrypt/live/ec2.devdanish.in/privkey.pem;

      root /usr/share/nginx/html;
      index index.html;

      error_page 404 /404.html;

      location = /404.html {
          root /usr/share/nginx/html;
          internal;
      }

      location = /index.html {
          root /usr/share/nginx/html;
          internal;
      }

      location / {
          try_files $uri $uri/ =404;
      }
      # forwards the request coming on path <base-url>/fast to our fastApi docker container
      location /fast/{
        proxy_pass http://fast:8000/;
      }

      # forwards the request coming on path <base-url>/next to our nextjs docker container
      location /next/{
        proxy_pass http://next:3000/;
      }

  }
Cool, now all we need to do is docker compose up and we are done. Our website is now running with TLS and serving over https.
With this our TLS part is done.
mTLS
This is what the entire setup was for. We needed all that background so we could understand what's coming next.
Key point from TLS
- Server presents its certificates
- Client verifies the keys with its trusted CA
- Upon successful verification, client trusts the server's authenticity
What is mTLS ?
mTLS is designed on top of TLS. Here not just the server but the client as well has to provide certificates for authentication.
This is used mostly in server to server communication. But other usecases include banking apps or IoT devices. But its not very common in browsers.
Imagine working on very sensitive data, like in a B2B fintech or healthcare. Our server is availble on public domain, but we want to ristrict the access to selected few consumers only. Of course, on code level we'll have authentication and authorization, but what if we could block the requests on server level itself. This is where mTLS comes in.
The server and client both validates each other's authenticity with their trusted CA. Now this is important, it kept me confused for a good while. Unlike in TLS, the server doesn't checkes the client's certificate with the authorized CAs like DigiCert or LetsEncrypt. Rather, server checks the client's certificates against its own CA. Let me explain
Server's CA for client's certificate validation
Client certificates aren't validated with the usual CA. In case of mTLS, server signs the client's CSR with its own CA. Thereafter, client shares its signed certificate to the server. Server uses the case CA to validate the certificates.
Understand with example
Let's assume, we have two companies. ABC Healthcare and XYZ Finance. XYZ finance handles payments for ABC Healthcare. To accept payments for ABC, XYZ needs to get bills of the patient from the hospital's API. The bills contains details about the pathalogy tests conducted, the medicines and services opted. This data can expose alot of details about the patient. Hence, the hospital opted to limit their API access to only selected few clients.
When a patient comes to pay their bill, XYZ Finance hits endpoints of ABC hospital to get their bills. At the time of discharge, ABC healthcare hits XYZ Fianance endpoints to check if the bills are cleared.
To serve https requests, ABC Healthcare needs authorized CA signed certificates. Similary, XYZ also need authorized CA signed certificates to serve https requests. Now, regarding mTLS, when XYZ Finanace is hitting ABC Healthcare endpoints, in this case ABC Healthcare is the server and XYZ Finanace is the client. When I say, client and server both validate each other's authenticity, this is how it goes.
- XYZ finanace, i.e. client, validates server's CA signed certificate, with its own trusted CA. These are the CAs that came prebundled with the software, like DigiCert.
- When ABC Heathcare server is checking client's certificates, it doesn't check those certificates with the CAs that came prebundled.
- It validates the client's certificates with CA in its truststore, which are to be explicity
mTLS setup
We'll understand in the above exmaple's context i.e. ABC HealthCare and XYZ finanace terms. Here ABC HealthCare is our mTLS server and XYZ Finanace is our mTLS client.
- XYZ Finanace generates a private key
- XYZ then generates a CSR
- XYZ shares this CSR with ABC
- ABC uses its own CA to sign the CSR
- ABC sends the signed certificate to XYZ
- XYZ sends this certificate with all the requests to ABC
- ABC validates the certificate with the same CA it used to sign the key with
In mTLS, the server uses a different CA to validate client's certificate. ABC(server) validate XYZ's (client's) certificate with a different CA.
If ABC hits XYZ's endpoint over https protocol i.e. ABC is client and XYZ is server, then ABC will use the default bundled CA for XYZ's certificates validation
Understand the flow
Take a look at mtls handshake diagram below
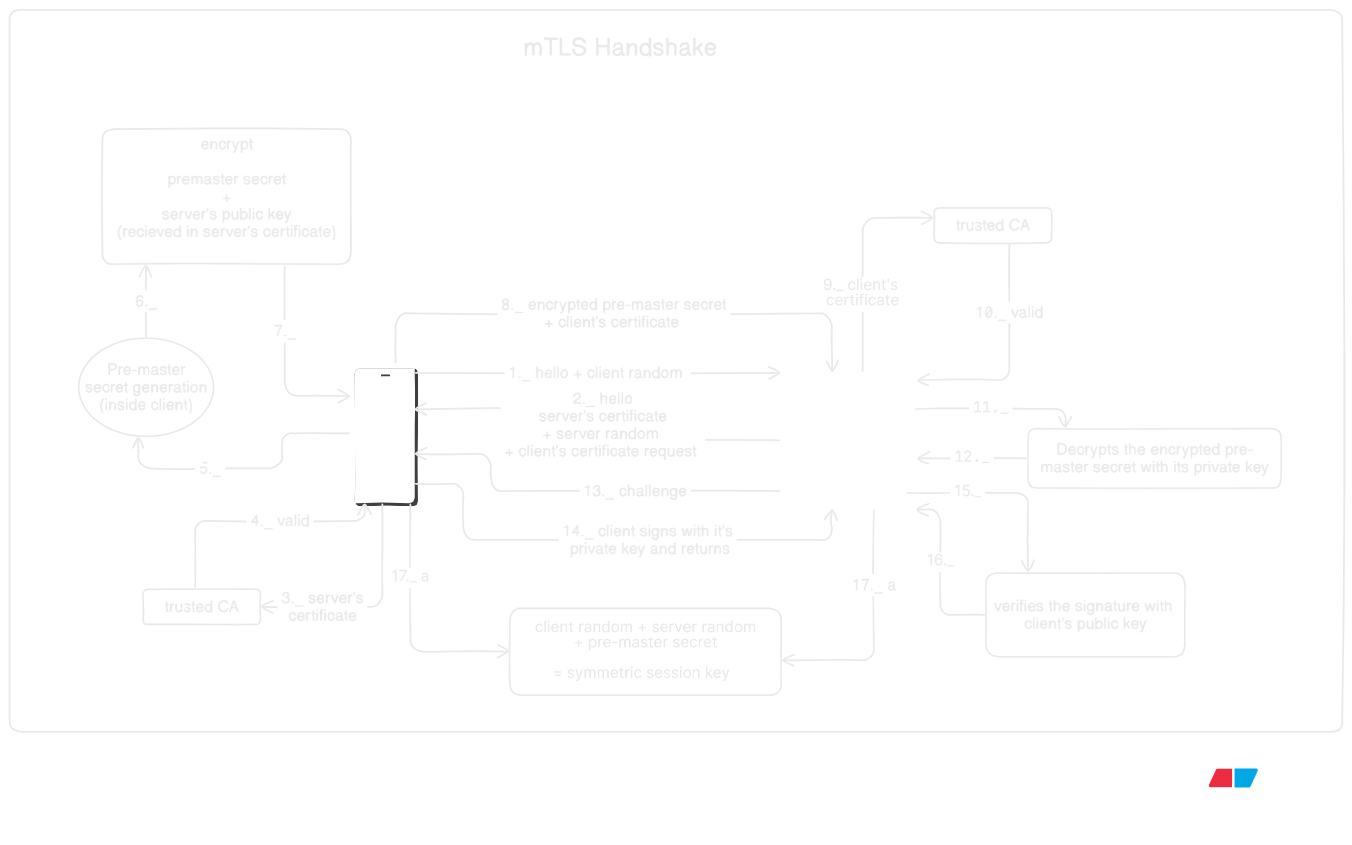
Let's now understand :
Step 1
- Client initiates the handshake with client hello and random
Step 2
- Server reponds with server hello
- presents its certficate, and
- request for client's certificate
Step 3
- Client validates server certificate with its trusted CA
Step 4
- CA provides validation results
- in case certificates are not valid, handshake fails
Step 5
- Client generates pre-master secret
Step 6
- Client wraps the pre-master secret with server's public key extracted from the server certificate
Step 7
- (maybe i added it just for visuals 😅)
Step 8
- Client sends encrypted per-master secret and its client certificate
Step 9
- Server verifies the client-certificate with its explicitly configured CA
- Handshake fails if certficates could not be validated
Step 10
- (again for visual aesthetics 😅)
Step 11
- Server decrypts the pre-master with its private key
Step 12
- (again for visual aesthetics 😅)
Step 13
- Server sends the handshake transcript to client
- This includes ClientHello, ServerHello, Server Certificate, CertificateRequest, ServerHelloDone, Client Certificate, ClientKeyExchange
Step 14
- Client signs with its private key
Step 15
- Server uses client's public key to verfiy the signature
Step 16
- (again for visual aesthetics 😅)
Step 13, 14 nad 15 combined ensure the handshake is not tempered with
Step 17
- Symettric session key is derived on both ends with client random, server random and pre-master secret
Also, note that in mTLS connection, client doesn't need to have its own SSL certificate. That means, its not necessary for the client to be hosted on https
Generate the certificates
Okay, let's execute the commands. We'll have to first follow the same steps we performed to generate certificates in TLS.
We can use the same CA but to avoid the confusion, we'll use create and use another CA and call it server_ca (as the server will add it to its trusted authority). It will sign the certificate for the client on behalf of the server, and this will be the certificate that the client will send in request and server will verify with its CA.
Here we'll need two CAs. First one will allow SSL connection, i.e. allow app to run on https.
This will be the one client and browser will add to their trust store. We had this step in TLS as well. We'll name this ssl_ca here.Second CA will be the one, that server will use to verify client identity. Server will add this to its trust store explicitly, and client certficates will be signed with this. We'll name this server_ca
- Get in the certificates folder and create the directories
mkdir certificate_authority client_certificates server_certificates
- Generate the ssl_ca private key
openssl genpkey -algorithm RSA -out certificate_authority/ssl_ca_private_key.pem
- Generate self signed certificate to ssl_ca
openssl req -new -x509 -key certificate_authority/ssl_ca_private_key.pem -out certificate_authority/ssl_ca_certificate.pem -days 365- Enter the basic details prompted for
- Generate server SSL certificate so that it can support https protocol. Start with the private key
openssl genpkey -algorithm RSA -out server_certificates/pro_dev_server_key.pem
- Let's generate the CSR which will later be signed with ssl_ca key
openssl req -new -key server_certificates/pro_dev_server_key.pem -out server_certificates/pro_dev_csr.csr- Make sure to leave the challenge password empty. We have nginx can't use those.
- Genrate server config file
echo subjectAltName=DNS:pro.dev,IP:127.0.0.1 > server_certificates/san.ext
- We'll need the ssl certificate signed with ssl_ca certficate
openssl x509 -req -in server_certificates/pro_dev_csr.csr -CA certificate_authority/ssl_ca_certificate.pem -CAkey certificate_authority/ssl_ca_private_key.pem -CAcreateserial -out server_certificates/pro_dev_server_cert.pem -days 365 -extfile server_certificates/san.ext
- With this, our server should be able to run on https. Import the ssl_ca certficates in a browser and try it.
- in edge browser, go here : `edge://certificate-manager/localcerts/usercerts
- hit import and select the
ssl_ca_certificate.pem - Update the certificate path in node server and run
- now open this https://pro.dev:3300/greet/danish
- start nginx and then try https://pro.dev/greet/danish
- Very cool, our ssl part is done
- Now let's start with the mTLS part
- Generate server_ca, the one our server will use to verify the clients with
- Let's start with the private key
openssl genpkey -algorithm RSA -out certificate_authority/server_ca_private_key.pem
- Generate the self-signed certificate (In production, CA certificate must be signed with a authorized CA)
openssl req -new -x509 -key certificate_authority/server_ca_private_key.pem -out certificate_authority/server_ca_certificate.pem -days 365
- This is important, we'll sign the client certificate with this CA
- Generate client private key
openssl genpkey -algorithm RSA -out client_certificates/bro_dev_client_key.pem
- Generate the CSR
openssl req -new -key client_certificates/bro_dev_client_key.pem -out client_certificates/bro_dev_client_csr.csr- Make sure to leave the challenge password empty. We have nginx can't use those.
- Sign the CSR with server_ca
openssl x509 -req -in client_certificates/bro_dev_client_csr.csr -CA certificate_authority/server_ca_certificate.pem -CAkey certificate_authority/server_ca_private_key.pem -CAcreateserial -out client_certificates/bro_dev_client_cert.pem -days 365
- In java, it's relatively easier to use
p12file. Its a wrapper of all these.openssl pkcs12 -export -out client_certificates/bro-dev-client-p12.p12 -inkey client_certificates/bro_dev_client_key.pem -in client_certificates/bro_dev_client_cert.pem- And don't enter any password. So, with this we have all the certificates we need
Code level changes
On the server side
Update the node server, like below. Notice ca, requestCert and rejectUnauthorized are set.
// Load server's private key and certificate, and CA certificate to verify clients
const options = {
    // private key
    key: fs.readFileSync(
    './../certificates/server_certificates/pro_dev_server_key.pem'
    ),
    // server certificate
    cert: fs.readFileSync(
    // CA signed certificate
    './../certificates/server_certificates/pro_dev_server_cert.pem'
    ),
    ca: fs.readFileSync(
    // CA certificate to verify clients
    './../certificates/certificate_authority/server_ca_certificate.pem'
    ),
    // Request client certificate
    requestCert: true,
    // Reject unauthorized clients
    rejectUnauthorized: true,
};
Our app is now configured to reject requests if client certificates verification fails.
Restart server and go to https://pro.dev:3300/greet/danish, notice how the page fails to load.
Try to run our java client, see how we get SSLHandshakeException. Our mTLS server is rejecting requests without proper certificate. Our server is pulically available,
but won't respond to all.
So, how do we get this working? We'll have to add the mtls_ca signed client certificates with our api calls. Let's do that
On the client side
On java side, we need to add the client keys to Key Manager, so they are sent with the request.
// Load the client identity keystore (contains private key + client cert)
KeyStore clientKeyStore = KeyStore.getInstance("PKCS12");
clientKeyStore.load(Files.newInputStream(Path.of("./../../certificates/client_certificates/bro-dev-client-p12.p12")), "".toCharArray());

// Initialize key manager with the client keystore (for client authentication)
KeyManagerFactory kmf = KeyManagerFactory.getInstance(KeyManagerFactory.getDefaultAlgorithm());
kmf.init(clientKeyStore, "".toCharArray());

// Set up SSL context with client keys + trusted CA cert
SSLContext sslContext = SSLContext.getInstance("TLS");
sslContext.init(kmf.getKeyManagers(), null , null);
Now when we make a request, the handshake completes and we get the response properly.
What about production?
Remember who we are? We are the pros, tech lead to be and future architechts. We think in production mode.
Now see how much hassle it is to setup for just one client and server. Now imagine, in production how many microservices we can have as mTLS client or server. Handling those many certificates for each microservice can be a nightmare.
So how do we fix that? Nginx is the way forward.
How do set up mtls with nginx?
Let's remove mTLS setup from our server first. Comment out ca in option, requestCert and rejectUnauthorized. Then restart the server and app should now be accessible https://pro.dev:3300/greet/danish but let's ditch this entirely. We won't handle any certificate at application level.
Now, we will update the nginx configuration to hit this endpoint. For mTLS it must be that the server is running on https. Which is already true since we have setup this with nginx in the tls section.
Start your nginx and try to access https://pro.dev/greet/danish if it's not working, go back to nginx + tls section and set it up
Now we'll setup nginx to request client certificates and reject the request if that is not available or could not be verified.
Copy the server_ca_certificate.pem to the ssl directory in <nginx_root>/conf/ssl/pro.dev and also the update the server private key and certificates with the newly creeated one. Else we'll have to update the java client as well.
In the conf file, update config like this for pro.dev
server{
        listen 443 ssl;
        server_name pro.dev;
        ssl_certificate ssl/pro.dev/pro_dev_server_cert.pem;
        ssl_certificate_key ssl/pro.dev/pro_dev_server_key.pem;
        ssl_protocols TLSv1.2 TLSv1.3;
        # this will tell nginx, which CA to use for client certificates verfication
        ssl_client_certificate ssl/pro.dev/server_ca_certificate.pem;
        # this will force to verfiy client certificate and reject requests otherwise
        ssl_verify_client on;

        location / {
            proxy_pass http://localhost:3200;
        }
    }
Save the changes and refresh nginx configs with nginx -s reload
Now try to access https://pro.dev/greet/danish, notice how nginx rejects the request with 400 and message No required SSL certificate was sent
Cool, now let's try to hit the same endpoint with our java client that already sends proper certificates. Just that in out main method will have to update the httpsUrl to remove the port number String httpUrls = "https://pro.dev/greet/danish"; And see how the application is able to connect and get proper response.
Congrats 🥳🎉, we have successfully set up production grade mTLS on our local
But this part is only focused on the server side. If you noticed, we are still managing certificates in client application. Don't forget who we are !! SAY IT OUT LOUD. Nice, let's fix that in the next section.
What if we have multiple clients that have to connect with mTLS?
Until now, we have used nginx as a reverse proxy. To solve this problem, we'll have to use nginx as a forward proxy. Here is how it'll work.
- we'll add a new server in nginx
- we'll setup upstream branch to the actual mTLS server url
- we'll attach the client certificates in the forward request
- Instead of hitting the actual url from our client applications, we'll hit this proxy url
- this url will then attach the certificates and forward our requests to the actual server
Sound genius, right?? Let's do this, let's goooooooo 🤩
Let's copy the client certificate and private key to <nginx_root>/conf/client-certificates/
Now in the default server, the one which listens to port 80, we'll add this location to act as our proxy
location /pro-dev-proxy/ {
            proxy_pass https://pro.dev/;
            proxy_ssl_certificate  client-certificates/bro_dev_client_cert.pem;
            proxy_ssl_certificate_key client-certificates/bro_dev_client_key.pem;
        }
And that's it. Our nginx is now taking care of the certificates. And just to be sure, remove the certificate we added here edge://certificate-manager/localcerts/usercerts. Cool, now let's try to access http://localhost/pro-dev-proxy/greet/danish boom, thats our app running on mTLS where nginx manages client and server certificates in a centralized manner.
Great, we now have actual production grade mTLS running on local 🥳🎉
A dev usually is done here. But we?! We are the pros man! We are aiming for Tech Lead and are future solution architects. We don't stop at simulating production setup on local. We set up the production and make it happen. Let's do this 🤩
Setting up mTLS with Nginx on EC2
To develop a better understanding, we'll use two different machines. We'll call one "ec2" which will be our client and the server would be called "ec3" althogh both would be ec2 instances.
Enough, lets spin up our instances.
We already had one from the TLS section, let's spin up one more. Use the same security rules and key for ease. ssh into the second instance and set-up docker and folder structure like we did earlier. Remove all the containers from last time and wipe the board clean.
We can repeat the steps above-mentioned to generate keys and sign them, but since we already have the keys we'll use the same pair for mTLS. However, TLS certificates we'll still get from certbot.
I'll use the first server as cient and the second one as the server.
I'll map client to ec2.devdanish.in and server to ec3.devdanish.in
Fell free to opt any name of your choice, just update the name I'm using
Get the certificates on server
- Copy the server-certificates to the second instance.
- Naviagte to
<nginx-root>/conf/ssl/pro.dev scp -i ~/.ssh/<key> server_ca_certificate.pem ubuntu@<ec2-server-ip>:~/nginx/certs/
- Naviagte to
- Copy the client-certificates to the first instance. here we'll need the private key and certificate both, so we'll copy the folder instead
- Navigate to
<nginx-root>/conf scp -i ~/.ssh/key_1.pem -r client-certificates/ ubuntu@<ec2-client-ip>:~/nginx/
- Navigate to
Make sure to setup certbot and dns updates like last time
Server setup
Setup services
To setup mtls, we'll need a app running, so that we can connect to it. We'll use the docker file below. Here we have a java app running, and we'll implement mtls with nginx to connect to this service.
Keep this in your home direcotry
services:
  boot:
    image: devdanishjaved/ec2-boot:v3
    container_name: boot
    restart: always
    networks:
      - ec2
  mtls:
    image: devdanishjaved/ec2-boot:v3
    container_name: mtls
    restart: always
    networks:
      - ec2
  nginx:
    image: nginx
    container_name: nginx
    restart: always
    ports:
      - "80:80"
      - "443:443"
    networks:
      - ec2
    volumes:
      - ~/nginx/default.conf:/etc/nginx/conf.d/default.conf:ro
      - ~/nginx/html:/usr/share/nginx/html:ro
      - /etc/letsencrypt:/etc/letsencrypt:ro
      - ~/nginx/certs/server_ca_certificate.pem:/etc/nginx/certs/server_ca_certificate.pem:ro
    depends_on:
      - boot
networks:
  ec2:
    driver: bridge
    name: ec2
Nginx setup
Now we'll need the nginx config file. I have left one endpoint open, and one will use mtls. Pay close attention on how we have mounted nginx volume to the local diirectory where we have kept the certificate. Also, we have mentioned the config file to be availble in nginx directory with default.conf name.
Key points in config
- Provide the CA to validate client certificates
- ssl_client_certificate /etc/nginx/certs/server_ca_certificate.pem;
- Since we have some ends points without mtls, we have to keep client verification optional
- ssl_verify_client optional;
- To enforece client verification we'll use the logic below
location /mtls/{
    # Manual mTLS check
        if ($ssl_client_verify != SUCCESS) {
            return 403;
        }
        proxy_pass http://mtls:8080/;
    }
Here is the full config file
Keep this in your user home/nginx directory with name default.conf. Effective path would be ~/nginx/default.conf
server {
    listen 80;
    server_name ec2.devdanish.in;
    return 301 https://$host$request_uri;
}

server {
    listen 443 ssl;
    server_name ec3.devdanish.in;

    ssl_certificate /etc/letsencrypt/live/ec3.devdanish.in/fullchain.pem;
    ssl_certificate_key /etc/letsencrypt/live/ec3.devdanish.in/privkey.pem;
    ssl_client_certificate /etc/nginx/certs/server_ca_certificate.pem;
    ssl_verify_client optional;

    root /usr/share/nginx/html;
    index index.html;

    error_page 404 /404.html;

    location = /404.html {
        root /usr/share/nginx/html;
        internal;
    }

    location = /index.html {
        root /usr/share/nginx/html;
        internal;
    }

    location / {
        try_files $uri $uri/ =404;
    }

    location /boot/{
    	proxy_pass http://boot:8080/;
    }

   location /mtls/{
	# Manual mTLS check
        if ($ssl_client_verify != SUCCESS) {
            return 403;
        }
    	proxy_pass http://mtls:8080/;
    }
}
Now run docker compose up and done Go to <your domain>/boot/health. For me, its https://ec3.devdanish.in/boot/health
Also, we have an endpoint setup with mtls, let's try to hit that https://ec3.devdanish.in/mtls/health and see how we get 403 - Forbidden
Okay, what if we hit it with our java client on local. Let's do that. But now two things have changed
- Ofcourse the url
- CA for server verification
Since we are now running the server on production, we have proper CA signed certificate. Hence won client side, we don't need to setup additional CA.
Just change two lines
String httpUrls = "https://ec3.devdanish.in/mtls/health";sslContext.init(kmf.getKeyManagers(), null, null);
Run the app and connect to your actual server over an mtls connection. Be honest, didn’t you get a killer dopamine hit? 🤩🤩
Now we have successfully setup our mtls server, we can similarly run our n numbers apps with mtls without worrying to handle certificates for each app. Nginx will take care.
mTLS client setup with nginx
We'll use the same folder structure ~ (user home)/nginx/default.conf ~ (user home)/ docker compose.yaml
You can set up nginx directly and update the conf. But I'll do it production like setup with docker. I have alot of services here, you can clean them and use only the nginx one.
docker file
services:
  fast:
    image: devdanishjaved/ec2-fast:v4
    container_name: fast
    restart: always
    networks:
      - ec2
  next:
    image: devdanishjaved/ec2-next:v6
    container_name: next
    restart: always
    networks:
      - ec2
  nginx:
    image: nginx
    container_name: nginx
    restart: always
    ports:
      - "80:80"
      - "443:443"
    networks:
      - ec2
    volumes:
      - ~/nginx/default.conf:/etc/nginx/conf.d/default.conf:ro
      - ~/nginx/html:/usr/share/nginx/html:ro
      - /etc/letsencrypt:/etc/letsencrypt:ro
      - ~/nginx/client-certificates:/etc/nginx/client-certificates:ro
    depends_on:
      - fast
networks:
  ec2:
    driver: bridge
    name: ec2
nginx conf
server {
    listen 80;
    server_name ec2.devdanish.in;
    return 301 https://$host$request_uri;
}

server {
    listen 443 ssl;
    server_name ec2.devdanish.in;

    ssl_certificate /etc/letsencrypt/live/ec2.devdanish.in/fullchain.pem;
    ssl_certificate_key /etc/letsencrypt/live/ec2.devdanish.in/privkey.pem;

    root /usr/share/nginx/html;
    index index.html;

    error_page 404 /404.html;

    location = /404.html {
        root /usr/share/nginx/html;
        internal;
    }

    location = /index.html {
        root /usr/share/nginx/html;
        internal;
    }

    location / {
        try_files $uri $uri/ =404;
    }

    location /fast/{
    	proxy_pass http://fast:8000/;
    }

    location /next/{
    	proxy_pass http://next:3000/;
    }

    location /mtls/{
    	proxy_pass https://ec3.devdanish.in/mtls/;
        proxy_ssl_certificate  /etc/nginx/client-certificates/bro_dev_client_cert.pem;
        proxy_ssl_certificate_key /etc/nginx/client-certificates/bro_dev_client_key.pem;
    }

}
Now try to hit https://your-domain/mtls/health and that's it. We are now able to connect to our server securily with mtls.
And that's a wrap. I hope you learned something and I could add value to your learning.
